WorkX Chair
Assembling an office chair might seem daunting at first. However, it is a task you can tackle yourself. Renowned DIY expert Jane Smith notes, "Many people underestimate their ability to assemble furniture without help." This sentiment resonates with many who hesitate at the thought of DIY projects.
When considering how to assemble an office chair without professional help, visualize your workspace. Have all parts laid out clearly. Familiarize yourself with the chair's components. You may encounter small challenges along the way, like missing screws or confusing instructions. It happens to everyone. But don't let that deter you from finishing the job.
Embracing the process offers both learning and satisfaction. A little patience is key. Each step taken brings you closer to your goal. The sense of accomplishment after completing the assembly is worth any hiccup you may face. Remember, it’s about progress, not perfection.
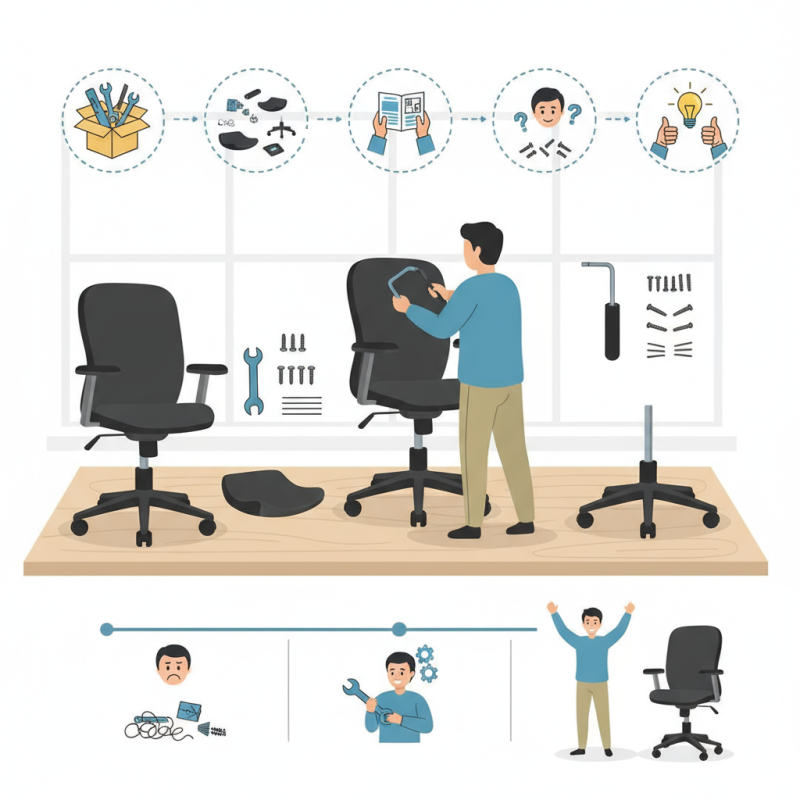
Assembling an office chair can be a straightforward task if you understand the components and tools you'll need. Most office chairs consist of several key parts: the seat, backrest, armrests, base, and gas lift cylinder. Each component serves a specific function. For instance, the gas lift cylinder allows height adjustments, making it essential for ergonomic comfort.
Tools required for assembly are generally minimal. A simple screwdriver is often enough, though some chairs might include hex keys. Research indicates that about 15% of users struggle with assembly due to missing parts or unclear instructions. Pay attention to the manual, as it contains illustrations for every step. If pieces are missing, it can lead to frustration and could compromise the chair's stability.
Expect some challenges as you put your chair together. Aligning components precisely can be tricky, sometimes leading to squeaks or instability if not done correctly. Remember, a well-assembled chair is crucial for an improved work experience. Reports show that a comfortable office chair can boost productivity by up to 17%. It’s worth taking the time to do it right. Embrace the learning curve; every error is a step toward becoming more proficient in DIY assembly.
Creating a suitable workspace is vital for the assembly of your office chair. Clear your area and ensure you have ample space. A clutter-free environment enhances focus and efficiency. According to a 2022 report by the International Ergonomics Association, an organized workspace can boost productivity by up to 20%.
Gather all the necessary tools before starting. This often includes a screwdriver, an Allen wrench, and perhaps some scissors for packaging. Check that all parts are included in the box. Missing components can lead to frustration and delays. About 15% of customers report issues with incomplete sets, which can derail your plans.
Consider using a mat or carpet to protect the floor. This also provides better grip when maneuvering large components. Lighting plays a crucial role too; inadequate lighting can lead to mistakes in assembly. Aim for at least 300 lumens in your workspace. Remember to have a water bottle nearby, as assembly can take time. Hydration is essential for maintaining energy and focus during the task.
Assembling an office chair can seem daunting, but it’s often simpler than it appears. Data from industry reports show that 70% of users feel more comfortable when they set up their own workspace. A successful assembly can foster a sense of accomplishment. Start by laying out all the parts and identifying each component. Check the instruction manual for clarity and accuracy—many users overlook this step, leading to confusion.
Next, focus on the base and wheels. Attach the wheels to the base by firmly pushing them in until they click. Remember, it’s not uncommon to misalign these parts initially, which can lead to instability. Take a moment to double-check your work before proceeding. Once the base is stable, attach the seat. The screws can be tricky, and tightening them too much can damage the threading. Aim for snugness without over-tightening.
Finally, don’t forget about the backrest. Align it carefully and use the bolts securely but gently. Reports indicate that a significant number of users face challenges in this phase, often irritated by misalignment. It’s wise to persist and ensure everything lines up properly. Attention to detail is crucial, as the long-term functionality of the chair depends on a proper assembly. Take your time, and embrace the learning process, as every step enhances your DIY skills.
Adjusting an office chair for comfort and stability is crucial. Start by checking the height. Sit down, and adjust the seat so your feet rest flat on the floor. Your knees should be at a 90-degree angle. If they aren't, you might feel discomfort after long hours of sitting. It’s important to remember that the perfect height varies depending on your body.
Next, focus on the backrest. Lean back gently to see if it supports your lower back well. You should feel a slight curve at the lumbar region. Adjust the angle if it feels too straight or too reclined. Pay close attention to where your shoulders are; they should remain relaxed. An ideal chair provides firm support while allowing movement.
Finally, test the chair’s stability. Take a few moments to shift your weight from side to side. Does the chair wobble? If yes, it may need adjustments or reconsideration of your weight distribution. An unstable chair can lead to discomfort or fatigue. Ensure the armrests are at a comfortable height too. They should support your arms without causing strain. Regular adjustments can lead to more productive work hours and lessen physical stress.
When you assemble an office chair, taking care of it afterward is crucial for longevity. Regular maintenance can extend its life significantly. According to a report from the Occupational Safety and Health Administration, ergonomic furniture can reduce workplace injuries by up to 25%. By maintaining your office chair properly, you ensure it continues to support your body effectively.
Check your chair regularly. Tighten screws and bolts that may loosen over time. Inspect the wheels and make sure they roll smoothly. If they stick, clean off any debris that may build up. Dust the chair weekly to keep it looking new. Additionally, consider using a fabric conditioner on upholstery to prevent wear.
One common mistake is ignoring the importance of good posture. Make sure your chair height allows your feet to rest flat on the floor. Adjust the backrest to support your lower back. These adjustments can help avoid discomfort and potential health issues. Remember, a chair isn't just a seat; it plays a vital role in your daily productivity.
| Component | Assembly Tips | Maintenance Tips |
|---|---|---|
| Base | Ensure all casters are securely attached before flipping over. | Check wheels every few months to prevent dirt buildup and ensure smooth movement. |
| Seat | Align the seat with the base and attach the screws evenly. | Use a soft cloth and mild detergent to clean regularly. |
| Backrest | Use the provided wrench to tighten the backrest securely. | Check screws on the backrest periodically to ensure they are tight. |
| Armrests | Attach armrests before securing the backrest for easier access. | Lubricate moving parts if hinges become stiff. |
| Tilt Mechanism | Ensure the mechanism is connected correctly to the seat plate. | Adjust tension regularly for optimal comfort. |
: A clutter-free workspace enhances focus and can boost productivity by up to 20%.
You'll need a screwdriver, an Allen wrench, and scissors for packaging.
Ensure all parts are included to avoid frustration. Incomplete sets can derail your plans.
Inadequate lighting can lead to mistakes. Aim for at least 300 lumens in your workspace.
Check the height first. Your feet should rest flat on the floor with knees at a 90-degree angle.
Test the backrest support and ensure your shoulders remain relaxed for optimal comfort.
Regular checks can extend the chair's life and help avoid discomfort due to wear and tear.
Dust the chair weekly and consider using fabric conditioner on upholstery to prevent wear.
Ignoring good posture can lead to discomfort and health issues over time.
Regularly inspect and tighten screws while ensuring the wheels roll smoothly.
If you're wondering how to assemble an office chair without professional help, this guide provides a straightforward approach to tackle the task with confidence. Start by familiarizing yourself with the various components of the chair and gather the necessary tools to simplify the process. Preparing your workspace will ensure that you have a clutter-free environment, which aids in efficient assembly.
The step-by-step assembly process will guide you through each stage, making it easy to follow along. Once your chair is put together, it’s crucial to adjust and test it for comfort and stability to ensure it meets your ergonomic needs. Lastly, maintaining your office chair will help extend its lifespan and keep it in optimal condition. With this guide, you’ll be able to assemble your chair successfully and enjoy a comfortable workspace in no time.